Saturday, December 8, 2012

Puffy Pancakes with Berries


These have been a favorite of my husband's since high school.  So, when I came across this version with berries in it, I was excited!  They have become the new favorite in our house and are requested daily!  They are quick and easy and you can make them with or without berries! We like ours with powdered sugar and syrup.

Puffy Pancakes with Berries
(4 servings)

3 T butter
3/4 cup flour
1/4 t salt
3 eggs
1 cup milk
1 t vanilla
1 cup berries (fresh or frozen blueberries, raspberries or blackberries or a combination)

Preheat oven to 450.  Once it is hot, place better in a cast iron pan (or just an oven safe glass pan) and place it in the oven to heat up and melt the butter.  

Combine the flour and salt in a large mixing bowl and whisk together.  In a separate bowl combine the eggs, milk and vanilla and whisk until smooth.  Add the wet ingredients to the dry and whisk until smooth.

Remove the hot pan from the over (the butter should be bubbly, but not burned).  Pour the batter into the hot pan and then add the berries.  Return the pan to the oven and cook for 12-15 minutes until nicely browned and puffy around the edges. 

Remove from the oven and sprinkle with powdered sugar.  Cut into pieces and serve with syrup.


Sunday, December 2, 2012

Buttermilk Chocolate Cookies


I wanted something new, yummy and chocolate for this rather warm Sunday. As I was browsing, I came across these cookies and was intrigued that they used buttermilk, especially since I had some in my fridge I needed to use.  I found them on this website.  I modified mine and used Andes Mint pieces in half of the dough.  The chocolate mint were the favorite in our house, but both are fantastic!
They got rave reviews by all and my 7 year old said they were definitely "blog worthy"!  They are soft, gooey and totally chocolatey! YUM!

Buttermilk Chocolate Cookies
(about 2 1/2 dozen)

2 cups flour
1/2 t baking soda
1/2 t salt
1/2 cup butter
3/4 cup cocoa powder
2 cups sugar
1 t vanilla
1 egg
2/3 cup buttermilk
2 cups chocolate chips (Andes Mint pieces, white chocolate chip or semi-sweet chocolate chips)

Preheat oven to 350.  Line a baking sheet with parchment paper.  In a medium bowl, whisk together flour, baking soda and salt.   Melt the butter in a microwave safe bowl.  In a large bowl, combine melted butter (still warm) with the cocoa powder and whisk until very smooth.  Whisk in the buttermilk, egg, vanilla and the sugar.  Gradually stir in the flour mixture until no streaks of flour remain.  Add the chips you are using or divide the dough in half and do 2 different kinds! Drop by the spoonful onto prepared pan about 2 inches apart (these spread).  Bake for about 10 minutes, until the cookies are set on the edges.  The middle will be doughy but firm up as they cool.  Let them cool for a few minutes on the pan and then cool completely on a wire rack.

Monday, October 15, 2012

French Bread Rolls


Bread... it is my weakness! As soon as Fall hits I kinda go on a rampage.  Especially on Sunday, there is just something about Sunday dinner that screams hot fresh bread! I found this recipe on Mel's Kitchen Cafe.  Melanie NEVER lets me down! These are so soft and chewy, they would be great as sandwich rolls too!

French Bread Rolls
(12 big ones)

1 1/2 cups warm water
1 T active dry yeast
2 T sugar
2 T canola oil
1 t salt
4 cups flour

In the bowl of a mixer, combine warm water, sugar and yeast and let proof for 3-5 minutes. Add oil, salt and 2 cups of the flour. Begin mixing and slowly add the rest of the flour. You may not need it all!  Watch the dough, it should clean the sides of the bowl but still be soft and smooth but still slightly tacky to the touch.

Knead the dough for 5 minutes if using a stand mixer or 8-10 minutes if kneading by hand.  Lightly spray a large bowl with cooking spray and place the dough in it.  Cover loosely with plastic wrap slightly sprayed with cooking spray.  Let the dough rise until double (about 1 hour).

Punch down the dough and turn it onto a lightly greased surface.  Divide the dough into 12 equal parts. shape them into balls and place on a lightly greased baking sheet.  Cover the rolls with lightly greased plastic wrap.  Be sure to cover the rolls loosely so the plastic wrap doesn't flatten the rolls as they rise.  Let the rolls rise until almost double, about 45 minutes.

Heat oven to 400 degrees.  Bake rolls for 12-14 minutes until lightly browned and cooked through.

Monday, September 17, 2012

Creamy Chicken and Wild Rice Soup


I found this recipe on this blog and have patiently waited for 2 long HOT months to make it.  At the first sign of a cooling trend (a rainy day) I quickly pulled it out.  I think I have found my new favorite comfort food!  I made mine in the crockpot, so super easy and I just LOVE smelling something yummy cooking all day! So the next rainy day or just a comfort food kind of day give this a try! Here is what I did...

Creamy Chicken and Wild Rice Soup
(6-8 servings)

3 cans chicken broth (about 5 cups)
1-2 cups water
2 boneless, skinless chicken breasts (I used frozen)
1 package Rice-A-Roni long grain and wild rice
1 cup chopped carrots
1 cup chopped celery
1/2 cup flour
1/2 cup butter
2 cups half and half
salt and pepper to taste (I didn't use any salt)

Combine water, broth, chicken, veggies, and rice with seasoning packet in a crockpot.  Cook on low for 6 hours or high for 4 hours (until chicken is tender and easy to shred).  Take chicken out and shred and then add it back in.  In a sauce pan, over medium heat, melt butter and add flour (like making a roux).  Cook this, stirring constantly until bubbly.  Slowly whisk in the half and half.  Once this is smooth, add this mixture to the crockpot and cook for 15 more minutes.  Salt and pepper to taste.

* I have made this a few times since and I didn't have any Half and Half so I just used fat-free milk.  it turned out great and I think I liked it even better!  It was still creamy and thick just not as rich and maybe even a little healthier :)!

Friday, September 7, 2012

Banana Chocolate Chip Muffins

So Yummy!  I didn't have any buttermilk to make my usual banana muffins so I went on a search for a recipe that didn't use buttermilk.  I found this recipe on the King Arthur Flour website.  They have never led me astray and this recipe just boosted my confidence in them!  You can really put whatever chips or nuts you want in them or leave them all out but I have to say the combo of semi-sweet chocolate and cinnamon chips was divine!

Banana Chocolate Chip Muffins
(12 muffins)

1/2 cup butter, room temperature
2/3 cup sugar
1 cup mashed, ripe bananas (I used 2 medium)
1 egg
1 t vanilla
1/4 t coconut flavor (optional, but so good)
1/3 c milk
1 1/2 t baking powder
1/2 t baking soda
1/2 t salt
2 cups flour (you can use half white and half whole wheat)
3/4 cup chocolate chips (optional)
3/4 cup cinnamon chips (optional)

Preheat oven to 350.  Lightly grease a muffin pan.

In a medium bowl, beat together the butter and sugar until creamy.  Beat in the banana, egg, vanilla, coconut flavor, and milk. Add the baking powder, baking soda, salt and flour and stir until smooth.  Add the chips (if using) and then divide evenly into the prepared muffin pan.  Bake the muffins at 350 for 20-25 minutes until a toothpick inserted in the middle comes out clean.

Tuesday, August 21, 2012

Buttermilk Drop Biscuits


I really like biscuits.  The buttermilk kind. The light and fluffy melt in your mouth kind.  But sometimes I just feel like biscuits can be a bit of work. So as my soup was simmering this afternoon and making my house smell delicious, I went in search of an easy buttermilk drop biscuit and boy, oh boy did I find one! They are easy, super light and fluffy and so stinkin' good!  I found them on this website.

Buttermilk Drop Biscuits
(8 big ones)

2 cups flour
1 T baking powder
2 t sugar
1/2 t cream of tarter
1/4 t salt
1/4 t baking soda
1/2 cup butter, cold, cut into small pieces
1 1/4 c buttermilk

Preheat oven to 450.  Lightly butter one large or two small cast iron pans or cookie sheet. Whisk together the dry ingredients, breaking up any clumps.  Add the chilled butter and cut into the dry ingredients with a pastry cutter until the mixture resembles coarse crumbs.  Add the buttermilk and stir with a fork just until everything is blended and a soft, sticky, blobbish dough forms.

Drop blobs of dough into the prepared pan leaving one to two inches apart. Bake at 450 for about 20 minutes or until the the tops are browned and the biscuits are cooked through.  I brushed the tops with melted butter as soon as they came out of the oven.

Thursday, August 16, 2012

Vanilla Pudding Chocolate Chip Cookies


If I had to pick just one dessert to eat for the rest of my life I would pick cookies.  I crave them daily, I dream about them at night, and I can honestly say they complete me...ok, that is really dramatic and a little over done, but I do LOVE them!  I have seen this recipe floating around a lot lately and I kind of always brushed it off, I am not sure why, especially not that I have made them!  They are completely worthy of my love!  I don't really know where this recipe originally came from but I found it here... mine is slightly altered.

Vanilla Pudding Chocolate Chip Cookies
(about 2 dozen)

1 cup butter, softened
3/4 cup dark brown sugar
1/4 cup sugar
3.4 oz package instant vanilla pudding
2 eggs
1 1/2 t vanilla
2 1/4 cups flour
1 t baking soda
1/4 t salt
2 cups chocolate chips (I used semi-sweet and milk)

Preheat oven to 350. Mix together butter and sugars until creamy.  Add the pudding, eggs and vanilla and mix again.  Add the baking soda and salt and mix one more time.  Add the flour (this is where I use my hand mixer).  I start with 2 cups and add the last 1/4 cup if it needs it. Lastly add the chocolate chips and mix.  Drop by the tablespoonful full and bake at 350 for 8-10 minutes.  Let them cool for 5 minutes on the baking sheet before removing to a cooling rack.


Tuesday, August 14, 2012

Chicken Florentine Pasta


It is about time, right?!!! I have been SOOO off the grid lately.  Call it moving across the country, call it summer vacation, call it laziness, call it whatever you want but I think it is high time I get a new post on here. If for no other reason than to NOT have to look at the cinnamon sticks any more!

I have been so NOT in the mood to cook lately, so I am forcing myself to come back slow and easy.  And that is exactly what this recipe is, well the easy part anyway!  I found it over at Picky Palate. My whole family loved it and the leftovers were great too!  I may have changed the recipe slightly...

Chicken Florentine Pasta
(8 servings)

2 T extra virgin olive oil
1 cup finely chopped onion
1 clove of garlic minced
4 cups fresh baby spinach leaves
2 cups cooked, shredded chicken breasts
1/4 t freshly ground pepper
salt to taste
2 cups Philadelphia Cooking Creme (found in the cream cheese section at the grocery store)  I used reduced fat Italian flavored, yum!
1 pound pasta, I used bowtie pasta, cooked al dente
1 1/2 cups shredded mozzarella cheese

Preheat oven to 350. Spray a 9x13 in pan with cooking spray.   Place the oil in a large pot and when it has heated up add onion and cook until soft.  Add the garlic and cook until fragrant, about 1 minute.  Stir in the spinach leaves and stir until wilted.  Add the cooked and shredded chicken and pepper and cook until heated through.  Add the cooking creme and mix well. Lastly, add the cooked pasta until combined. Salt to taste,  I didn't add any.  Transfer this mixture to the baking dish and top with shredded cheese.  Bake for 20-30 minutes, until the cheese is melted.  Serve with salad and breadsticks.


Tuesday, June 19, 2012

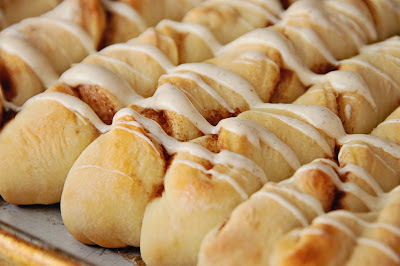
Cinnamon Twists with Cinnamon Cream Cheese Frosting


I woke up this morning wanting a cinnamon roll so bad!  But they take way longer to make than I was willing to wait.  So as I sat dreaming, I remembered a pizza place in Provo, UT that used to make cinnamon twists called Tricky Sticks.  They came like bread sticks with frosting to dip them in.  And then I remembered a couple of weeks ago I made these bread sticks.  Well, the wheels started turning and I morphed the two ideas and came up with these! Quick and easy and oh so good!

Cinnamon Twists
(15-20 sticks)

1 1/2 cups warm water
3 T sugar
1 T yeast

Mix this together and let it stand for 5 minutes. Then add:
3 1/2 cups flour
1 t salt

For the middle:
1/4 cup butter, softened
1/3 cup sugar
2 t cinnamon

Mix the dough until smooth and let it rise for 10 minutes.  Roll the dough, on a floured surface, into a big square.  Brush the softened butter over the lower half of the dough and sprinkle it with the sugar and cinnamon.  Fold the top half down and cut the dough into 15-20 sticks.  Twist each stick and place it on a lightly greased cookie sheet. Let the twists rise for 15-20 minutes while the oven preheats to 400.  Bake the twists for 15 minutes or until golden brown.

Cinnamon Cream Cheese Frosting

2 T butter, softened
2 T cream cheese
1 1/2 cups powdered sugar
1/4 t cinnamon
1/2 t vanilla
3 T milk

Beat together the butter and cream cheese until smooth.  Add the rest of the ingredients and beat until smooth.  Drizzle over warm twists and save the rest for dipping!

Sunday, June 17, 2012

Honey-Lime Chicken Skewers

I found this recipe at Kitchen Meets Girl.  I LOVE that these are grilled but still a little Mexican.  I made THIS rice to go with it but added black beans and corn.  So yummy, my whole family loved it!

Honey-Lime Chicken Skewers


3 T soy sauce
2 T honey
1 T vegetable oil
juice of one lime
2 garlic cloves, minced
2 t Siracha (hot sauce)
2 T cilantro, chopped
1 pound skinless, boneless chicken breasts (about 3-4 breasts)

In a bowl, combine all the ingredients, except chicken, and mix thoroughly. Cut the chicken into cubes and add it to the marinade, mix to coat.  Let this marinate for at least 1 hour.  Skewer the chicken and grill on medium high heat for 6-8 minutes per side or until the chicken is cooked through.  Serve with Mexican rice.

*If you are using wooden skewers, do not forget to soak them in water for 30 minutes before using.

Friday, June 15, 2012

Brownie-Bottom Coconut Chocolate Cream Cake

I KNOW! I have totally been MIA!  With the school year ending and planning a cross-country move for my family in 2 weeks (Eek!) things couldn't be crazier!  We have eaten out more than I care to admit and when we do eat at home it has been quick sandwiches or leftovers, so NOT exciting.  But after numerous people commenting on my lack of cooking, including (and most importantly) my patient and understanding husband, I thought I might need to suck it up, do the dishes from last week and cook something already!! So, what do I turn to first? Dessert, of course!  I found this recipe on Willow Bird Baking, changed some things, used my favorite other things, and ended up with a super delicious dessert for my hubby for Father's Day, which we have been celebrating all week because there is no time to celebrate all at once (back to the whole crazier than crazy life we are living at the moment!)  So, if you are needing something special for the sweet Father or Father's in your life, this is a great one!

Brownie-Bottom Coconut Chocolate Cream Cake

Brownie:
1/2 cup butter (1 stick)
1 cup sugar
2 eggs
2 1/2 heaping T cocoa powder
1/2 t vanilla
1/2 cup plus 1 T flour

Coconut Cream Filling:
1 1/2 cups half and half
1 1/2 cups coconut milk
2 eggs
3/4 cup sugar
1/4 plus 4 t cornstarch
1/4 t salt
3/4 cup flaked coconut
1/4 t coconut extract
1/4 t vanilla extract

Chocolate Mousse:
1/4 cup butter, cut into pieces
2 eggs, separated and at room temperature
1/2 cup whipping cream
1/2 T vanilla extract
4 ounces bittersweet chocolate (I used Ghirardelli 60%)
1/2 cup sugar
pinch of corn starch

Whipped Cream:
3/4 cup whipping cream
1/4 cup powdered sugar
1/2 t vanilla

toasted coconut for garnish

For the brownie layer:
Preheat oven to 350. Melt the butter.  Add the sugar and eggs and beat together.  Add the rest of the ingredients and mix.  Pour the batter into a greased 9 inch spring form pan.  Bake for 12-15 minutes, until a toothpick comes out clean.

For the coconut cream:
While the brownie layer is cooking, combine the half and half, coconut milk, eggs, sugar, cornstarch, and salt in a sauce pan.  Cook over medium low stirring constantly until the mixture thickens, about 8-10 minutes. Once the mixture is thickened, remove from the heat and add the vanilla, coconut extract and the untoasted flaked coconut and stir to combine. Pour this over the brownie layer.  Place plastic wrap directly on the coconut cream to keep a film from forming and chill in the fridge for at least 2-4 hours, or until completely cold.


For the chocolate mousse:
Melt the butter in a medium bowl set over a sauce pan of simmering water (do NOT allow the bottom of the bowl to touch the water!).  In a separate small bowl, whisk together egg yolks, cream and vanilla and set aside.  Once the butter is melted, slowly whisk in the yolk mixture.  Continue whisking over the simmering water until the mixture thickens, like pudding, this will take about 8-10 minutes.  Once it is thick remove it from over the water and add the chocolate, stirring to melt.  Set aside.  In a separate bowl beat together the egg whites, sugar and pinch of cornstarch until stiff peaks form.  Whisk 1/4 cup of the stiff egg whites into the chocolate to loosen it up.  Now add the rest of the egg whites, folding gently until they are completely blended into the chocolate.  Pour this mousse over the cold coconut cream in the spring form pan.  Place the whole thing back in the fridge and let it set completely, about 4 hours.

Finishing the cake:
Make your fresh whipped cream by beating together the whipping cream, powdered sugar and vanilla until peaks form.  Add this to the top of the cold cake and then top with toasted coconut.  To serve, run a knife around the edges of the spring form pan to loosen it from the sides.  Remove the sides and cut into slices.


Monday, May 21, 2012

Kale Chips


I have seen these all over the internet lately and since we LOVE kale in our house (we even grow it in our garden), I just had to give them a try.  They have been given the stamp of approval, even by my 4 year old! They are quick and easy and super tasty!

Kale Chips


1 bunch of kale, washed and dried
1-2 T olive oil
kosher salt

Preheat oven to 350. Once the kale has been washed and dried, remove the big stems and tear the kale into large pieces (the size you want your chips to be).  Toss the kale with the olive oil until it is coated.  Place the kale in a single layer on a cookie a sheet and sprinkle with kosher salt, be careful not over salt it, a little goes a long way!  Bake the kale at 350 for 15-20 minutes until the kale is crunchy.  Serve warm or cold, be careful the kale is super delicate.

Monday, May 14, 2012

Pizza Factory Breadsticks


When my husband and I lived in Provo, UT we LOVED going to the Pizza Factory, we went for the breadsticks mainly, but their food was good too!  They make their breadsticks all twisted on tall dowels and serve them in a big vase.  So fun!  So, when I spotted this recipe over at Six Sisters Stuff, I just couldn't resist!  I have made them a couple of times now and my husband has declared them his new favorite!  They are super yummy and also super fast, bonus! Here is my take on them...

Pizza Factory Breadsticks
(15-20, depending on how fat you make them)

1 1/2 cups warm water
2 T sugar
1 T yeast

Let that sit for 5 minutes. Then add:
3 1/2 cups flour
1 t salt

To brush on top:
1/2 stick butter (1/4 cup), melted
garlic salt

Mix until smooth and then let rise for 10 minutes.  Roll the dough into a large square on a floured surface. Mix together the melted butter and garlic salt and brush half of it onto the dough.  Fold the dough in half and cut into 15-20 strips (about 1 inch each).  Twist each strip and place on an UNGREASED cookie sheet.  Let the twists sit for 15 -20 minutes to rise (I just let them rise while the oven is preheating).  Bake the breadsticks at 400 for 15-20 minutes or until golden brown.  As soon as they come out, brush the tops with the remaining garlic butter. 


Sunday, May 13, 2012

Fried Ice Cream


Let me just start by saying, this recipe is NOT for those looking for a light, fit treat! The name pretty much sums it up.  BUT if you are willing or able to spare the calories, this is to die for!  We found this recipe on Food Network quite a few years ago and LOVED it! We pulled it back out for a special Mother's Day treat and liked it even more than we remembered!

Fried Ice Cream
(4-8 servings, depending how big you make the ice cream balls)

1 quart vanilla ice cream (we used Haagen Daz)
1 cup crushed corn flakes
1 cup sweetened coconut, or 1 cup chopped nuts, or 1 cup cookie crumbs, or any combination (we used equal parts of pecans and vanilla wafers)
2 eggs
2 T sugar
vegetable oil, for frying

toppings:
hot fudge or caramel (we used this recipe) It is really Buttermilk Syrup, but if you cook it a little longer is makes delicious caramel sauce for ice cream!
whipped cream
fresh berries (optional)

With an ice cream scoop, form 4 to 8 ice cream balls and place on a wax paper lined sheet and cover with plastic wrap.  Freeze for at least 2 hours.

In a bowl, combine cornflake crumbs with either cookies crumbs, nuts or coconut (or whatever combo you are using).  Spread the mixture in a shallow dish.  Roll the ice cream balls in the mixture until they are coated and freeze for 30 more minutes.

In another bowl, beat together the eggs and sugar.  Dip the coated ice cream balls in to the egg mixture and then roll them, one more time, in the cornflake mixture until completely coated.  Freeze for one more hour.

When the ice cream balls are super hard, heat enough oil to cover a ball in a large pot or in a fryer to 400 degrees. When the oil is up to temperature, lower the balls, one at a time into the oil and fry until golden brown (about 30 seconds to one minute). Remove from the oil and serve immediately.  Top with Hot fudge or caramel and whipped cream and fresh berries.

Thursday, May 10, 2012

Lemon Poppy Seed Scones


I love scones and I love lemon!  These come together so fast and are so beautiful and delicious, you just can't go wrong!  Such a great way to start a beautiful, sunny morning! I found this recipe at Our Best Bites.

Lemon Poppy Seed Scones
(8 scones)

2 cups flour, lightly spooned into the measuring cup and leveled with a knife
1/3 cup sugar
1 t baking powder
1/4 t baking soda
1/4 t salt
1 t poppy seeds
8 T frozen butter
1/2 cup sour cream, I used light
1 egg
zest of 1 lemon

Glaze


1/4 cup lemon juice
2 T melted butter
1 1/3 cup powdered sugar

Preheat the oven to 400. Line a baking sheet with parchment paper and set aside.

In a medium bowl, combine the flour, sugar, baking soda, baking powder, poppy seeds and salt.  Add the lemon zest and whisk to combine.  Grate the frozen butter (or used a food processor) and toss it into the flour mixture.  Combine it with your fingers until it resembles coarse meal.  set aside.

In a small bowl, whisk together sour cream and egg.  Add this to the flour/butter mixture and toss with a fork until it comes to a ball and all the flour is moistened.

Lightly flour a surface and place the dough on it. Press the ball into an 8 inch disk and cut into equal wedges using a butter knife or pizza cutter. Place them evenly on the prepared baking sheet and bake for 15-17 minutes or until lightly golden.  Remove from the oven and let them cool.

While the scones are cooling, whisk together the glaze.  Drizzle over the scones. IF you do it while they are still warm, it will spread over the top and drip down the sides, my favorite! Or you can do it when they are cool and drizzle squiggles on the tops.

Tuesday, April 24, 2012

Roasted Vegetable Pasta


This is a simple, tasty, summery pasta recipe.  I LOVE all of these flavors combined, and roasting the vegetables gives them such rich flavors. Topped with fresh grated Parmesan cheese and fresh basil make this dish so wonderful and light!

Roasted Vegetable Pasta
(4 servings)


Penne pasta (I LOVE Barilla brand PLUS)
4 medium tomatoes, cut into bite sized pieces
2 zucchinis, cut into bite sized pieces
1 small eggplant, cut into bite sized pieces
4 cloves garlic
extra virgin olive oil
sea salt
fresh ground pepper
fresh grated Parmesan
fresh basil, chopped

Preheat oven to 450. Cut up veggies and place on a cookie sheet. Add the 4 cloves of garlic, leaving the skin on so they will not burn while roasting.  Drizzle veggies with Extra virgin olive oil and season with salt and pepper.  Toss to coat evenly.  Roast veggies for about 20 minutes or until they are soft and slightly browning on the edges, stirring every few minutes.  When the veggies are done, remove skin from the garlic and mince.  Add it back into the veggies. While the veggies are roasting cook pasta to al dente.  When they are both done, top pasta with veggies and then add fresh grated Parmesan cheese and fresh basil.  Adjust salt and pepper to desired taste. Serve with crusty bread!

Monday, April 23, 2012

Rotisserie Chicken Salad


This is my go to chicken salad recipe.  I have made it for many baby showers and always get asked for the recipe which makes me chuckle because it is so easy and basic.  The key is to use a Rotisserie chicken all that flavor is what makes people think you are a genius!  I LOVE the ones from Sam's Club but any rotisserie chicken would work just fine.

Rotisserie Chicken Salad
(8 to 10 servings)

1 Rotisserie chicken, skin and bones removed and roughly chopped
2-3 ribs of celery, chopped
1/2 - 1 cup pecans, chopped
1-2 cups red grapes, cut in half
mayonnaise to desired consistency (I LOVE Hellman's lite)
fresh ground pepper to taste
salt to taste (I usually don't need any)

Mix all the ingredients in a bowl to combine.  Serve on toasted whole wheat bread (as shown), on croissants, or anything else that suits your fancy!

Thursday, April 5, 2012

Olive Garden Bread Sticks


My kids LOVE Olive Garden for their bread sticks and Alfredo sauce.  So, when I came across this recipe on this blog, I thought why not give it a shot.  To be honest, I wasn't really that hopeful, but I was pleasantly surprised!  And I love surprises, so it was a win/win for us! They even had that yummy butter crust on the bottom just like Olive Garden's do! I did alter the recipe a bit, I have made enough bread to know a thing or two about the flavor I like, so here is what I did...

Olive Garden Bread Sticks
(24 bread sticks)

1 1/2 cups warm water
2 1/4 t yeast
4 cups flour (I used bread flour, but all-purpose would work fine)
2 T butter, melted and cooled slightly
1 T sugar
1/2 T salt

topping:
4 T butter, melted
1 t garlic powder
1/2 t salt

In a large bowl, dissolve yeast and sugar in warm water.  Allow it to sit for about 10 minutes until it gets frothy.  Add the flour, salt and melted butter to the yeast mixture. Mix in a stand mixer or by hand until fully combined.  The dough should be moist but not sticky and should hold in a ball.  Knead the dough for a few minutes until  it is smooth.  Divide dough into 24 pieces and roll with your hands into bread sticks (like making a snake). Place them on a greased cookie sheet.  Cover the dough and let it rise in a warm place for 45 minutes to an hour.

Preheat the over to 400 and once it is hot put the bread sticks in.  While they are in, melt 4 T butter and mix it with 1 t garlic powder and 1/2 t salt. After the 5 minutes are up, brush the bread sticks with the melted garlic butter.  Pop them back in the over for an additional 5 minutes or until they are golden brown.  Remove them from the oven and brush them once more with the garlic butter.  Serve them warm.

Monday, March 26, 2012

Graham Cracker Cookies


I found these on the back of a box of graham crackers and thought I would give them a try.  Not only are they fantastic, but they are also egg free! So, if you just want to eat the dough, there is no guilt (well, almost!)  I also thought the dough would be great to use in cookie dough ice cream or in cookie dough truffles.  The cookies reminded me of Magic Cookie Bars, most of the same ingredients, just put together differently!

Graham Cracker Cookies
(4-5 dozen)

1 1/2 cups honey graham crackers, finely crushed
1/2 cup flour
2 t baking powder
1 (14 oz) can sweetened condensed milk
1/2 cup butter, softened
1 t vanilla
2 cups chocolate chips
1 cup chopped nuts (optional)
1 cup flaked coconut

Preheat oven to 350.  In a medium bowl, mix together graham cracker crumbs, flour and baking powder.  In another bowl, beat sweetened condensed milk and butter together until smooth.  Add vanilla.  Add the crumb mixture and stir until smooth.  Add in the chocolate chips, coconut and nuts and stir until combined.  Drop by the teaspoonful onto a lightly greased cookie sheet.  Bake for 9-11 minutes or until lightly browned on the edges.   Let them cool for 5 minutes before moving them to a wire rack.

Sunday, March 18, 2012

Mint Oreo Milk Shake


I have a VERY hard time resisting mint Oreos!  Regular Oreos I can walk by all day long, but there is just something about mint that tempts me!  For this reason they are NEVER in my house, but seeing as how it was St. Patrick's Day AND my husband has some Irish heritage, I thought, why not?!  And boy am I regretting it, I guess I have to put in 24,000 more hours at the gym to make up for this weekend's mint Oreos!  But oh, they were soooo good!  Here is what I put into these mint Oreo milk shakes...

Mint Oreo Milk Shake
(about 6 servings)

Vanilla ice cream
mint Oreos
milk
malt powder
whipped cream (for garnish)
green sprinkles (for garnish)

Ok, I fill my blender with vanilla ice cream (do NOT pack it down).  Add a tablespoon or 2 of malt powder, and 9-10 mint Oreos.  Add milk until it fills the cracks and crevices about 3/4 of the way to the top of the blender. (I like my shakes thick, so I add more after I start to blend).  Blend until smooth, adjusting the milk or ice cream as needed until the shake is the consistency you like (I stir, carefully, as it blends with a spoon to get things moving).  Pour into glasses and top with whipped cream and sprinkles.

Wednesday, March 7, 2012

Rice Krispie Treats

Ok, so this is just one of those recipes that when I want to make them, I can NEVER find the recipe!  So, here it is my friends!  Although, I do change the recipe a little, I like mine gooey!

Rice Krispie Treats


4 T butter
5 1/2 cups mini marshmallows
6 cups rice krispie cereal
1 t vanilla

Grease a 9x13 pan with cooking spray. Melt the butter and marshmallows in a large pan over medium-low heat.  Once the mixture is smooth, add the vanilla and stir to combine.  Add the rice krispie cereal and stir until evenly coated.  Dump into prepared pan and press down evenly using your hands sprayed with cooking spray.  Let them cool for about 20-30 minutes.

Thursday, March 1, 2012

Chicken Enchilada Soup


We have been making this soup for years, so I don't remember where the recipe came from.  I do remember it being a copy cat recipe from Chili's (the restaurant) Chicken Enchilada Soup.  No matter how I got a hold of it, it has been a house favorite for quite some time!  It is just a fantastic soup and different then other mexican or tortilla soups I have had.  This one is just so perfectly delicious!  

Chicken Enchilada Soup
(8-10 servings)

1/4 cup vegetable oil
2 T chicken base
1 1/2 cup diced onions
1 t cumin
1 t chili powder
1 t minced garlic
1/4 t cayenne pepper (this will NOT make it spicy)
1 cup masa harina, corn flour (you can find this at any grocery store)
2 quarts water
1 cup crushed tomatoes
1/4 pound American cheese, cut into small cubes (I totally don't like this but it is amazing and creamy in this soup!)
2-3 chicken breasts, cooked and shredded

garnishes:
shredded cheddar cheese
tortilla chips 
avocado

In a large soup pot, heat oil.  Add onion, chicken base and spices.  Saute until the onions are soft, about 3-4 minutes.  In another container, combine 2 cups of the water with the masa harina, stirring until all lumps dissolve.  Add this to the sautéed onions, stirring constantly, and let it cook for 2-3 minutes once it starts to bubble, this will eliminate the raw flavor of the masa harina. Add the remaining water slowly, whisking as you go until the soup is smooth. Add the tomatoes, let the soup come to a boil, stirring occasionally.  Add cheese to the soup and stir to melt.  Add the chicken to the soup and stir to heat through.  Top with shredded cheese, crushed tortilla chips and fresh avocado!

Tuesday, February 14, 2012

Gourmet Chocolate Dipped Strawberries


These are always impressive and always delicious (and SUPER easy! Shhhhh, don't tell!)  I made these for the boys in my life on this stay-at-home-with-3-sick-kids Valentine's Day!  They are so easy my 3 year old helped me do them!  So, no excuses!  These puppies can be $1 a piece at candy stores! (I have totally posted this before, but these are GOURMET, hence the nuts and coconut!)

Gourmet Chocolate Dipped Strawberries

Fresh strawberries, washed and dried (leave the stems on for dipping)
Good chocolate (I always use Ghirardelli) milk chocolate, white chocolate, or semi-sweet 
nuts, chopped fine (I used pecans)
coconut
mini chocolate chips
toffee bits
oil

Line a cookie sheet or two with wax paper, set aside. Mix chocolate chips with about 1 t oil per cup of chips in a sauce pan.  Heat over LOW heat stirring constantly until the chocolate is melted and smooth.  Remove from heat.  Repeat process with as many different kinds of chocolate as you want to use. (I used milk and white for these).  I always melt my chocolate stove top, I have more control this way and I have found it helps the chocolate to not seize (especially the white chocolate).  Dip the washed and dried strawberries in the chocolate one at a time and then roll in what ever toppings you want, or a mixture of them.  Place dipped strawberries on wax paper. Let them sit for a couple of minutes and then drizzle with alternating kids of chocolate if desired.  I just use a spoon with a side to side motion.  Try it first over a separate piece of wax paper to get the feel for it.  Let the strawberries set up completely.  I find this is best in a cool place or the fridge. Store extras in the fridge for a few days.


Wednesday, February 8, 2012

Perfect Guacamole


This is the ONLY recipe you will ever need for this!  It is beyond delicious, perfectly simple and oh so fresh! We LOVE Mexican food at our house!  And good guacamole tops the chart! My husband and I often wonder why it is so many restaurants serve nasty guacamole when it is so easy to make!  The hardest part is finding GOOD avocados.  Once you have that handled, well the rest is just too easy!

Guacamole

4 ripe avocados*
juice of 1/2 a lime
1/4 cup salsa, the fresher the better!
garlic salt, to taste

In a bowl mash up the avocados with the lime juice.  We used a potato masher, if you want it smoother and creamier, use an electric mixer.  Stir in the salsa and garlic salt.  

To pick perfect avocados, buy ones that are hard and let them soften on your counter.  They are ripe when the are still firm to the touch but have a little give to them.  If you try and buy them ripe, they are usually over ripe or bruised.  We store almost ripe avocados in our fridge and they ripen a lot slower.  Let them come to room temperature before using, it will make them easier to mash.  

Storing left over Guacamole is tricky, we have found the best way is to press plastic wrap to the top of the leftovers in a bowl removing all the air bubbles. Like when you press plastic wrap onto the top of pudding to prevent a film from forming.

Monday, January 30, 2012

German Chocolate Cupcakes


Hello Beautiful!  I absolutely LOVE German chocolate anything!  It is the perfect combination... pecans, coconut and chocolate!  I saw a picture of something like this on pinterest but wanted to use all of my favorite components.  I LOVED how they turned out and will be skipping lunch so that I can justify having these multiple times today, is that wrong?  Oh well, who cares!  These are to good to pass up!

German Chocolate Cupcakes
(24 cupcakes)

Cake:
My favorite recipe, I already posted it here! I made it with a chocolate cake mix and chocolate pudding. Cool completely before frosting.

Coconut-Pecan Frosting:
(Recipe from my BFF Abby!  Here is the link)
1 (12 oz) can evaporated milk
1 cup sugar
3 egg yolks
1 stick (1/2 cup) butter
1 t vanilla
1 1/3 cups shredded, sweetened coconut
1 cup chopped pecans

In a medium sauce pan, combine evaporated milk, sugar, butter, egg yolks and vanilla.  Cook over medium heat, stirring constantly until the mixture thickens, but do NOT boil.  It should coat the back of the spoon.  Stir in the coconut and pecans.  Let the frosting cool for 20-30 minutes stirring occasionally.

Chocolate Buttercream Frosting:
1 stick (1/2 cup) butter, softened
3 cups powdered sugar
4 oz semi-sweet chocolate chips, melted and cooled
2 heaping T cocoa powder
1 t vanilla
a pinch of salt
3-4 T of milk, or more until desired constancy

Melt the chocolate chips in the microwave or on the stove top over low heat until smooth.  Beat together all the ingredients until the frosting is smooth and whipped.  Start with the least amount of milk and add more as needed to desired constancy.

Assembly:
Using a pastry bag and frosting tip, pipe on a ring of chocolate buttercream frosting around the top of each cooled cupcake.  Fill the middle of the ring with a spoonful or two of the coconut-pecan frosting.  Store in a cool place to let the frosting set up a little.


Thursday, January 26, 2012

Dark Chocolate Cookies


When I first saw these on Pinterest, they had me at one glance!  But, I truly knew it was meant to be when I went to get out the ingredients and I had EXACTLY enough powdered sugar and just enough chocolate chips to make these!  We were meant for each other!  These are unlike any other cookie I have made.  I don't even have the words to express how I feel about these... they are divine, decadent, rich and heavenly!  They will satisfy a chocolate craving like this Double Chocolate Torte but with much less effort!  They have a little crunch on the outside but are soft and gooey on the inside! So there you have it, these just might be what you need for the love in your life for Valentine's day!

Dark Chocolate Cookies
(makes about 16-18 cookies)

1 1/2 cups semi-sweet chocolate chips, divided
3 large egg whites, room temperature
2 1/2 cups powdered sugar, divided
1/2 cup cocoa powder
1 T corn starch
1/4 t salt

Preheat oven to 350. Spray two cookie sheets with cooking spray and set aside.  Melt one cup chocolate chips in the microwave or on your stove over low heat, until melted.  Cool slightly.

Using an electric mixer, beat the egg whites until stiff peaks form.  Gradually beat in one cup powdered sugar until mixture resembles soft marshmallow cream.  In another bowl whisk together 1 cup powdered sugar, cocoa powder, cornstarch and salt to blend.  On low speed, beat dry ingredients into egg whites mixture.  Stir in lukewarm melted chocolate and the last 1/2 cup chocolate chips. The dough will get very stiff.

Place 1/2 cup powdered sugar into a bowl.  Roll rounded Tablespoons of dough in powdered sugar and place on prepared cookie sheet, about 2 inches apart. Bake until the cookies puff up and cracks form on the tops, about 8-10 minutes.  Cool on sheets for 10 minutes and then remove to wire rack to cool.

Monday, January 23, 2012

Orange Rolls (No Rise)


I LOVE Orange Rolls (you know me and citrus!). So when I found this recipe on Our Best Bites, I knew I had to try it!  They came together so fast and they are so totally yum!  They have a biscuit texture with orange roll flavor...seriously, they are addicting!  So the next time you want a sweet roll for breakfast with out the hassle of letting yeast dough rise, this is for you!

Orange Rolls (No Rise)
(makes 12 rolls)

For the dough:
3/4 cup cottage cheese
1/3 cup buttermilk
1/4 cup sugar
4 T butter, melted
1 t vanilla
2 cups (9 oz.) flour
1 T baking powder
1/2 t salt
1/4 t baking soda

Filling:
4 T butter, softened
1/2 cup sugar
zest from 1 orange (I used 2 Cuties mandarins)

Glaze:
2/3 cup powdered sugar
1 T melted butter
2 T orange juice (I juiced the two mandarins that I zested)

Preheat the oven to 400.  In a food processor, combine the cottage cheese, buttermilk, melted butter and vanilla. Process until smooth, about 10 seconds.

Now, add the flour, baking powder, salt and baking soda and pulse in short bursts just until the dough clumps together (DO NOT over-process).  The dough will be very soft. Don't add any more flour!  Scrape the dough onto a lightly floured surface and knead a few times just until smooth.

Roll the dough out on a lightly floured surface.  Make it into a 12x15 rectangle.

Now put the filling on.  Spread the dough with the softened butter, sprinkle evenly with the sugar and the orange zest.  Roll the dough from the long side, making a long snake. Cut it into 12 equal parts and place into a greased pie pan.  

Bake for 20-25 minutes or until the tops are golden brown.  While they are cooking, whisk together the glaze ingredients.  When the rolls come out of the oven, drizzle with the glaze.  Serve warm!


Saturday, January 14, 2012

Chocolate Banana Muffins


Saturdays at our house are usually pancake/waffle day but sometimes I just need to mix it up a little. And I NEEDED chocolate today (ok, I need Chocolate everyday!) But, at least this way, I could disguise it as breakfast!  These muffins are moist and delicious and who doesn't love banana and chocolate!

Chocolate Banana Muffins
(12 muffins)

2 cups flour
1 cup sugar
1/2 cup cocoa powder
3/4 t baking soda
1/2 t salt
1 t cinnamon
3 very ripe bananas, pureed (about 1 1/2 cups)
6 T butter, melted and cooled
2 eggs
1/2 cup plain Greek yogurt
1 1/2 t vanilla
1 cup chocolate chips

Preheat oven to 350.  Grease or line a muffin pan and set aside. In a large bowl whisk together flour, sugar, cocoa, cinnamon, salt and baking soda.  In a medium bowl whisk together bananas, eggs, yogurt, butter and vanilla.  Mix the wet mixture into the dry by gently folding it with a rubber spatula.  Add chocolate chips, being careful to NOT over mix the batter.  Fill the muffin cups until almost full. Bake for 20-25 minutes, be careful to not over bake.  They are done when a toothpick comes out with some moist crumbs on it.  Cool in pan for 5 minutes before removing to a wire rack to cool completely.  


Thursday, January 12, 2012

My Favorite Lemon Bars

I usually don't start into my citrus kick until closer to Spring, but call it the SUPER mild winter we are having or the fact that I am just so giddy that this is my LAST Michigan winter, I have been craving lemon bars for a few weeks now.  I finally gave in and turned to THE BEST recipe I know for these! I know that I already have a lemon bar recipe on here but this one totally trumps the first one.  I thought about just replacing the other one but I was afraid that someone out there LOVES the other one and didn't want to take it away from them.  With that said, I would replace the other one in a heartbeat with this one.  The ratio of lemon to crust is perfect, the lemony flavor is perfect, the crispy crust is perfect.  I really just can't say enough about these!  So, hands down this is the recipe you want if you are craving lemon bars or Spring, or sunshine (because these literally scream sunshine to me!).  I got this recipe out of this cookbook (it is one of my favorites!)

Lemon Bars

2 cups flour
1 cup butter, room temperature
3/4 cup powdered sugar
1/4 t salt
4 eggs
2 cups sugar
1/2 cup fresh lemon juice
1/4 cup flour
1/2 t baking powder
powdered sugar for garnish

Preheat oven to 350.  Grease a 9x13 in pan. In a medium bowl, combine 2 cups flour, butter, powdered sugar and salt until crumbly.  Press the mixture into the prepared pan, making sure it is even.  Bake for 15 minutes until light brown on the edges.  In another medium bowl, Beat together eggs, sugar, lemon juice, 1/4 cup flour, and baking powder.  Pour the lemon mixture over the crust and bake at 350 for 20-25 minutes or until set in the middle.  You will know it is set as it will not jiggle.  Sprinkle with powdered sugar. Cool completely before serving.

Wednesday, January 11, 2012

Veggie Chowder

I found this recipe on this blog.  I was excited to try it, seeing as how my 6 year old keeps telling me he is vegetarian and doesn't even like chicken!  So, I LOVE finding soups that are full of good veggies and that he will eat!  This one did not disappoint and we will for sure be making it often.

Veggie Chowder
(6 servings)

2 T butter
1/2 cup chopped onion
1 cup chopped carrots
1 stalk celery, chopped
1 T minced garlic
4 cup chicken or vegetable broth
2 large potatoes, peeled and chopped (I used about 8 small red potatoes with the skin on)
1 1/2 T flour
1/2 cup water
2/3 cup milk
2 cups chopped fresh broccoli
2 heaping cups shredded cheddar cheese

Melt butter in a large soup pot.  Add the onions, carrots and celery and sauté over Medium heat until the veggies are tender.  Add the garlic and cook for another minute or two.  Add the broth and potatoes, bring to a boil and cook until the potatoes are tender.  Mix flour with water and add to the soup. Simmer until the soup is slightly thickened.  Add milk and broccoli and cook until the broccoli is just tender.  Stir in the cheese until melted and then serve immediately.

Sunday, January 8, 2012

Almond Roca


I have LOVED Almond Roca for as long as I can remember!  It is totally one of my favorite candies.  So, you can imagine how excited I was to come across this recipe.  But I was even more thrilled when it was easy, quick and OH SO GOOD! 

Almond Roca

3/4 cup toasted, chopped almonds*
1 cup light brown sugar
1 cup (2 sticks) butter
6 oz (about 1 cup) milk chocolate chips

Butter a 7x11 inch pan.  Sprinkle half of the almonds on the bottom of the pan.  

In a heavy sauce pan, over medium high heat, melt the butter and then add the brown sugar.  Stir gently until boiling.  Reduce heat to medium and continue boiling until the temperature reaches 300 degrees (hard crack stage).  The best is to use a candy thermometer, doing it with timing can be tricky, especially if this is your first time making this.  If it gets higher than 320 it will NOT remain solid.  

Pour the hot mixture over the almonds in the buttered pan.  Pour the chocolate chips over the top and let them sit for a minute or two to melt.  Once they are melty, use a spatula to spread them evenly over the top.  Sprinkle the remaining chopped almonds over the melted chocolate.  Let the whole thing cool until the chocolate has set.  Use a sharp knife to break the almond roca into pieces.  Store in an air tight container.

*to toast almonds spread them in a dry skillet and cook them over medium heat, stirring occasionally, until they begin to lightly brown and you can smell them.  Let them cool completely.  Toasting nuts gives them a much crunchier texture and a richer flavor.

Saturday, January 7, 2012

White Bread


I am usually a wheat bread kinda gal but today I just had this craving for good, comfort food, white bread.  The kind you pull out of the oven, cut into before it has cooled down, slather in butter to watch it melt into the bread and eat it while it is still steaming!  So, my search began!  I came across this recipe on this blog.  She had me at "Grandma".  You know if it is something that someone's Grandma made it is just going to be perfect!  Because that usually means that the recipe is not only tried and true but also taking it back to the basics.  No fancy, schmancy stuff.  And that is exactly what I got, and MAN was it good.  Just the stuff to satisfy my random craving! (And NO, I am NOT pregnant!)

White Bread
(6 loaves) I totally cut this recipe in half, so I just have 3!

2 cups milk
3/4 cup sugar
9 t salt (I cut this down to 8)
3/4 cup butter
6 cups warm water
4 T yeast
24 cups flour

Put the milk, sugar, butter and salt into a medium sauce pan.  Heat over Medium-high heat stirring constantly until the mixture just comes to a boil. Remove from heat and let it cool down.

Put the warm water in a mixing bowl, add the yeast and a pinch of sugar.  Stir and allow to sit until the yeast starts to bubble (about 5 minutes).  Stir in the milk mixture.  Add half of the flour and mix until smooth.  Keep adding flour until the dough is smooth and elastic.  Let rise in a warm, draft free place until it is double in size.  Punch down and allow the dough to rest for 15 minutes.  Shape into loaves and place into greased bread pans.  Bake at 350 for 30-45 minutes (mine were done at 30 minutes) or until they are lightly browned and hallow sounding when you tap the top.  Remove from the oven and let cool.
Related Posts Plugin for WordPress, Blogger...